There are 02 ways of installing an eSIM on Samsung: Installation with QR code and Manual Installation. See each one step-by-step below:
- If you plan to take a trip in Laos, have you prepared all the necessary things in your luggage? Personal items, visa, plane ticket, and an important thing – internet connection. eSIM for Laos travel is one of the most convenient to stay connected everywhere in Laos. This is a complete guide with everything you need to know about using an e-sim card for traveling to Laos including a comparison of the best Laos e-sim cards for 2024.
- Let us recommend you that getting connected with an e-sim card when traveling to Laos will make your life so much easier! Based on my our experiences on our recent trip to Vientiane and Luang Namtha the internet censorship in Laos.
How to activate eSIM on iPhone, Samsung, and Google Pixel phones, etc. is easy. Everything starts with an eSIM QR Code, a compatible device, and a Wi-Fi connection, and then 2 – 3 minutes of setup. Let’s figure it out with us now.
After placing an order for an eSIM, you will receive a QR Code, SM-DP+ Address & Activation Code. The thing you need to do now is to set up it on your device and activate it for usage.
Don’t know how to start? We are here to help.
In this post, we will guide you through steps to set up and activate a data eSIM (including the eSIM for Laos provided by https://laos-esim.com) on your device, including:
- What to prepare before start,
- How to set up and activate your eSIM
- FAQ
Good to know:
- Basically, an eSIM can be installed automatically by scanning the QR Code or manually. Although we guide you through both, the former is highly recommended.
- For a travel eSIM, you should install the eSIM on your device before departure and activate it upon landing in your destination.
- The setup will take you around 2 or 3 minutes only.
- If you are using a data eSIM for Laos, and you use a 5G smartphone, please disable 5G on the eSIM and switch to 4G / LTE.
- Turn off your Cellular Data Switch to avoid the roaming fee.
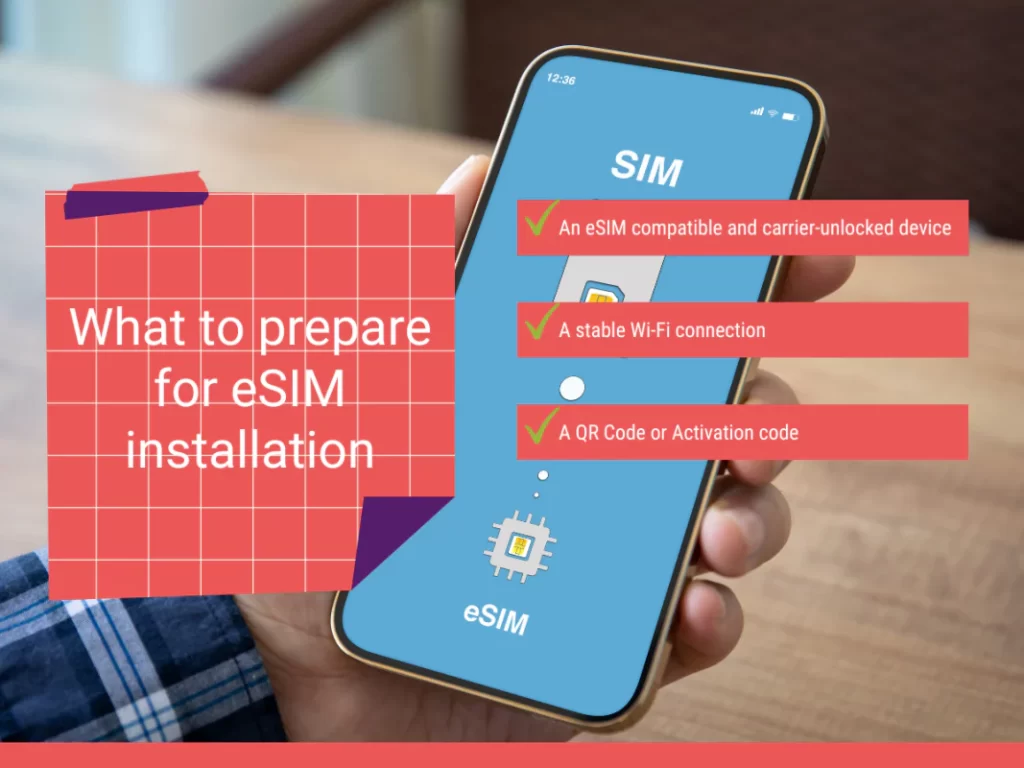
1. What to prepare before starting eSIM installation and activation?
To get started with the eSIM installation on your device, please make sure that the following items are ready:
- An eSIM-compatible and carrier-unlocked device.
- A stable Wi-Fi connection (not mobile data of another phone), and
- An eSIM QR code for scanning
- eSIM Laos Number Phone: +856xxx
Tips
- Print your QR code, or borrow someone’s device to keep your eSIM QR code if you have no second device (another phone, desktop, laptop, etc.) to keep it).
- Take note of your SM-DP + Address & Activation code somewhere on your device for easy manual setup by copying and pasting if you cannot print your QR code or have no second device to keep it, or just in case your scanning fails and you need to set up your eSIM manually.
2. How to activate eSIM in Laos
Before installation eSim in Laos data plan, you need to first make sure that your phone supports the eSim functionality. Unfortunately, this is not available for all phones. You can find a list of supported smartphones
ios devices
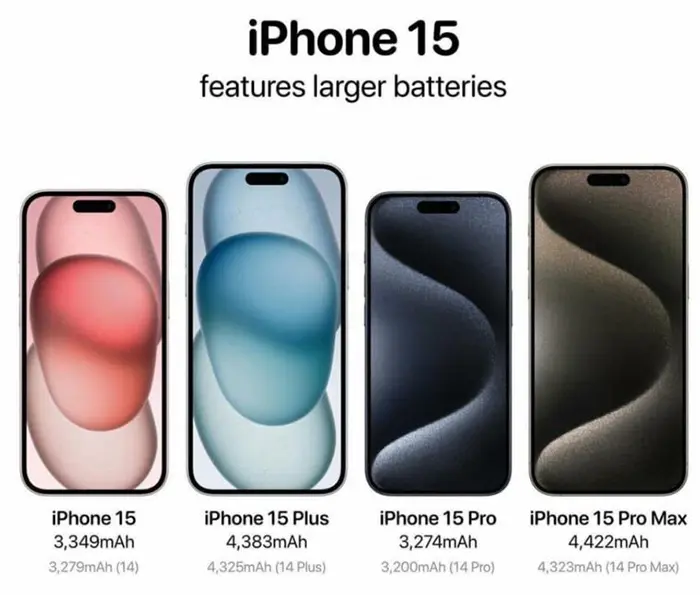
- iPhone 15, 15 Plus, Pro, 15 Pro Max
- iPhone 14, 14 Plus, Pro, 14 Pro Max
- iPhone 13, 13 Mini, 13 Pro, 13 Pro Max, SE 3 (2022)
- iPhone 12, 12 Mini, 12 Pro, 12 Pro Max
- iPhone 11, 11 Pro, 11 Pro Max
- iPhone XS, XS Max, XR
- iPhone SE (2020, 2022)
- iPad Pro 11-inch (1st, 2nd and 3rd generation)
- iPad Pro 12.9-inch (3rd, 4th and 5th generation)
- iPad (7th, 8th and 9th generation)
- iPad Mini (5th and 6th generation)
- Apple watch series 3, 4, 5 and 6
- Apple watch SE
- iPad Pro 12.9-inch (3rd, 4th and 5th generation)
Android Devices (Samsung)
- Galaxy S23, S23+ 5G, S22 Ultra 5G, Galaxy Z Flip, Flip 5
- Galaxy S22, S22+ 5G, S22 Ultra 5G, Galaxy Z Flip, Flip 4
- Galaxy S21, S21+ 5G, S21 Ultra 5G
- Galaxy S20, S20+, S20 Ultra
- Galaxy Z Flip, Flip 3
- Galaxy Note 20, 20+, 20 Ultra
- Galaxy Fold, Fold 2, Fold 3
- Galaxy Watch
- These devices are not compatible: Galaxy S20 FE, Galaxy S20/S21 (US versions), Galaxy Z Flip 5G (US versions), Galaxy Note 20 Ultra (Versions from the US and Hong Kong), Galaxy Fold 2 (Versions from the US and Hong Kong).
Google Pixel
- Google Pixel 8 Series
- Google Pixel 7 Series
- Google Pixel 6, 6a, 6Pro
- Google Pixel 5
- Google Pixel 3, 3XL
- Google Pixel 3, 3aXL
- Google Pixel 4, 4a, 4XL
- These devices are not eSIM compatible: Google Pixel 3 devices from Japan, Australia, and Taiwan, Google Pixel 3a from South East Asia.
Every data eSIM will go through 2 steps to be ready in your device and data usage.
In this section, we will guide you through:
- How to activate eSIM on iPhone
- How to activate eSIM on Samsung phone, and
- How to activate eSIM on Google phone.
The wording may be slightly different depending on your device. So, in case you have difficulty installing your eSIM, please contact your eSIM provider.
2.1 How to activate eSIM on iPhone
If you are using an iPhone, check the eSIM iPhone list to make sure you can use the eSIM on it, and follow the instructions below for its use.
2.1.2 Steps to install your eSIM manually on iPhone
| Check the email we sent you with both the “SM-DP + address” code and the “Activation Code”. If you have not received your code, contact us. | Next, go to “Mobile Data ”, click on “Add eSIM” or “Add Data Plan” and select “Use QR Code” | Scan the QR code to start the installation process. Use our guide below for step-by-step configuration. |
Steps to install your eSIM manually
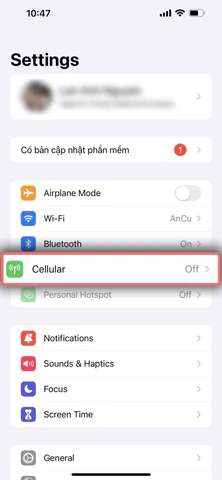
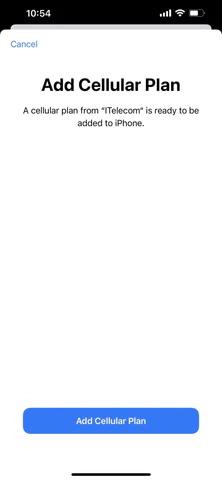
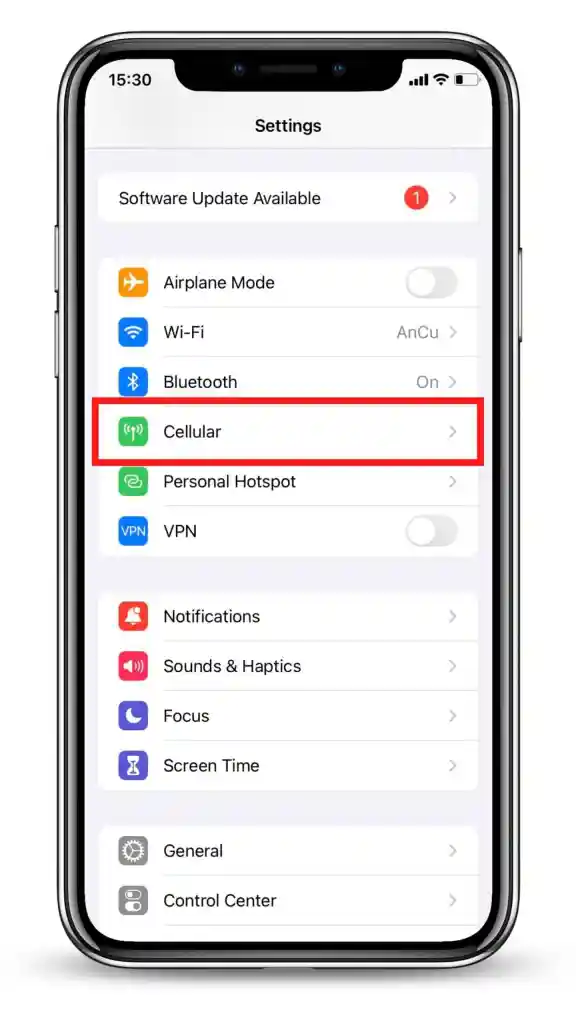
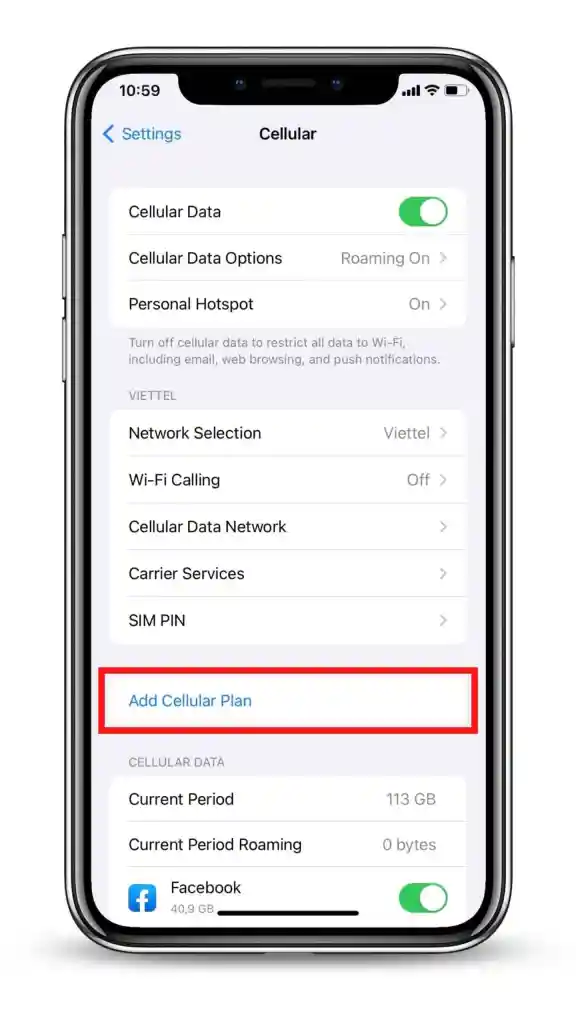
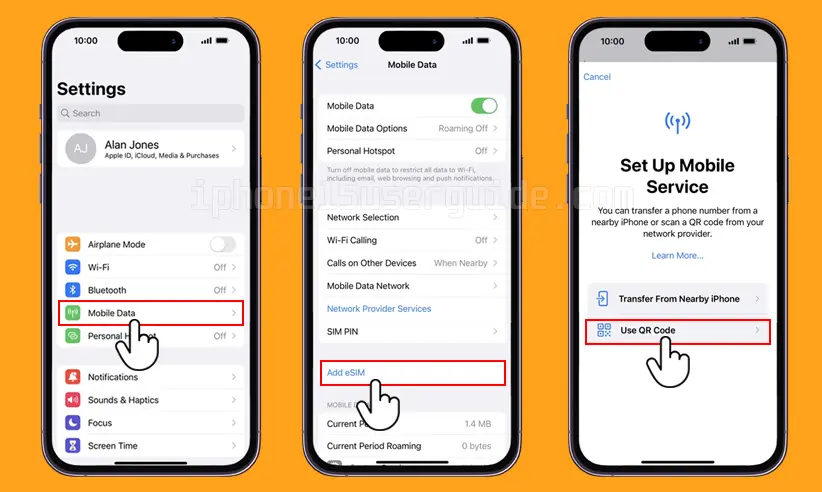
- Step 1: On your iOS device, go to Settings > Cellular.
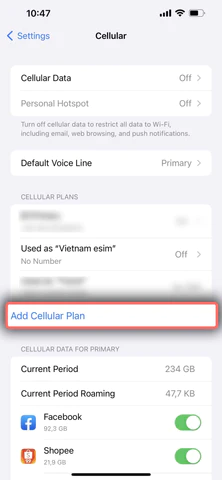
- Step 2: Select Add Data/Cellular Plan.
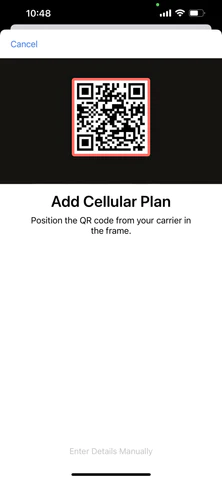
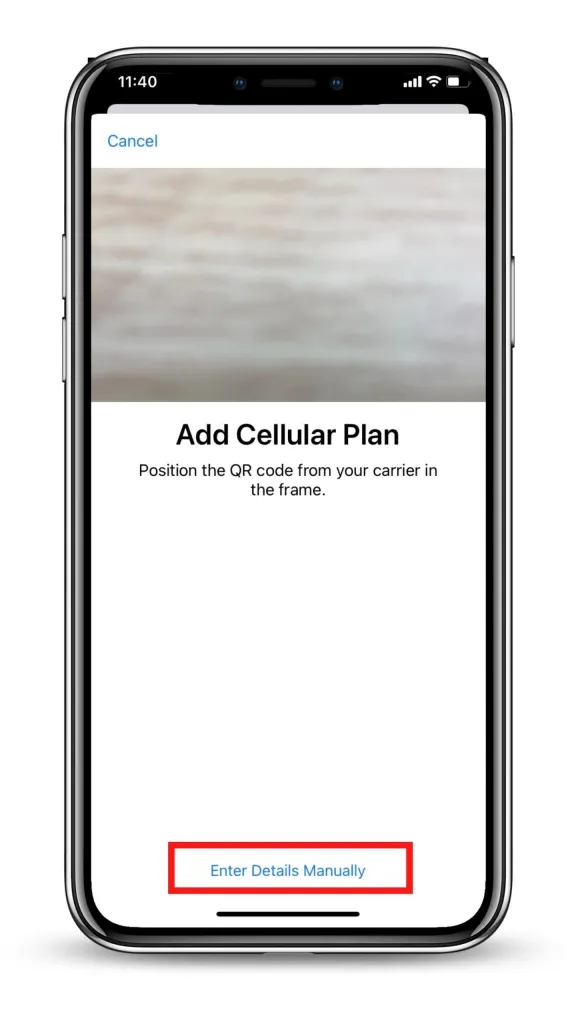
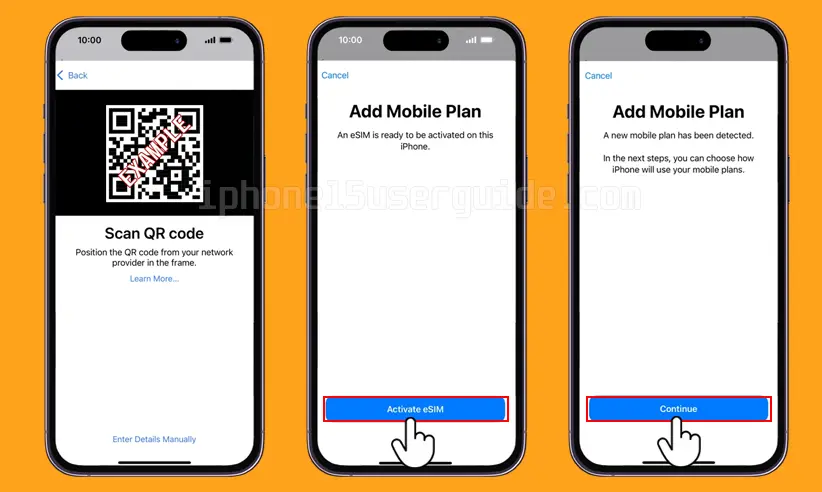
- Step 3: If you cannot scan the QR code sent by your eSIM provider due to a certain reason, you can still activate your eSIM manually by selecting Enter Details Manually.
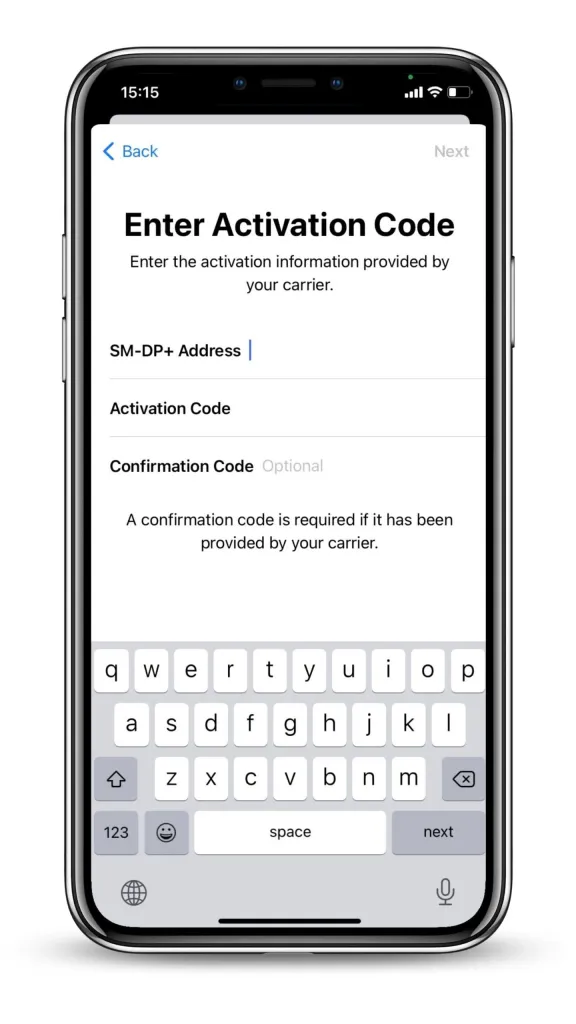
- Step 4: Enter the required information including
- SM-DP+ Address
- Activation Code
- Confirmation Code (if required)
- Then, select Next.
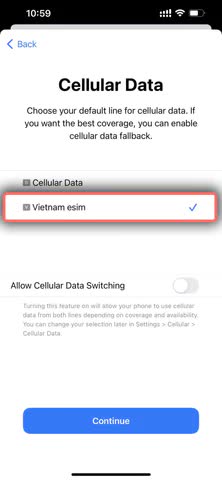
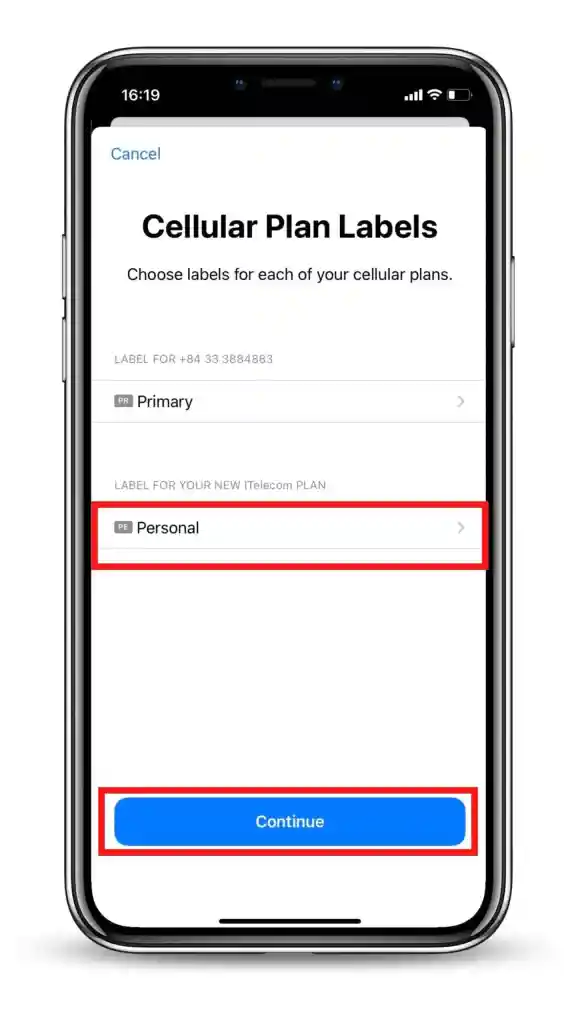
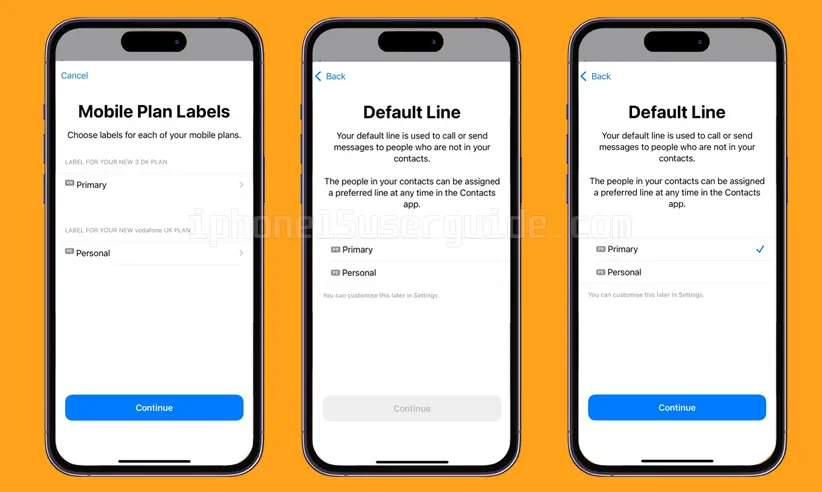
- Step 5: On the screen named Cellular/Mobile Data Plan Labels, select the available label (like Secondary, Business, Travel,… ) or Label your eSIM profile as you want (i.e. Vietnam eSIM), and tap Continue.
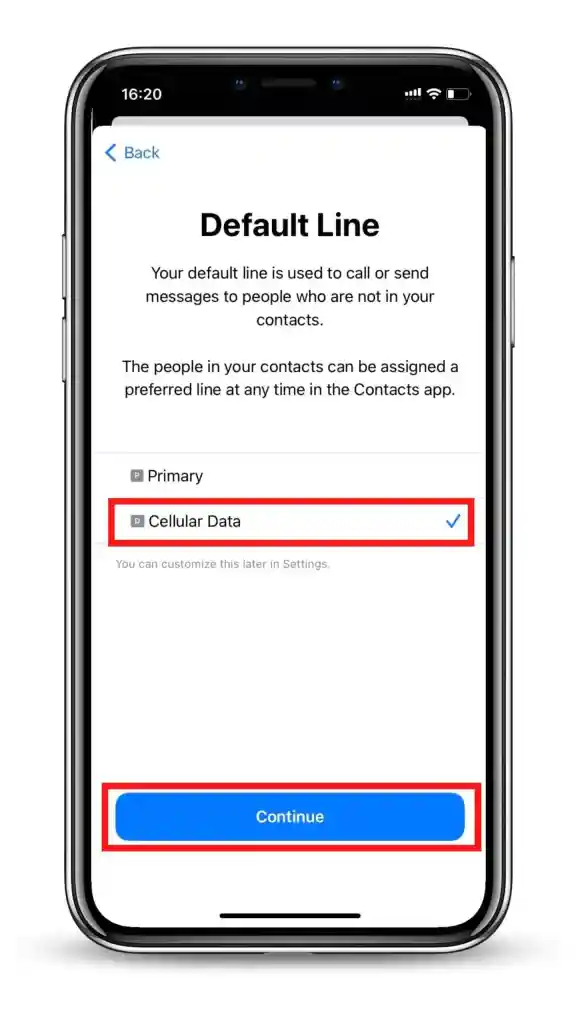
- Step 6: Set your eSIM profile as the Default Line (if your data eSIM comes with a phone number) or select your Primary number if your data eSIM does not come with a phone number), then choose Continue.
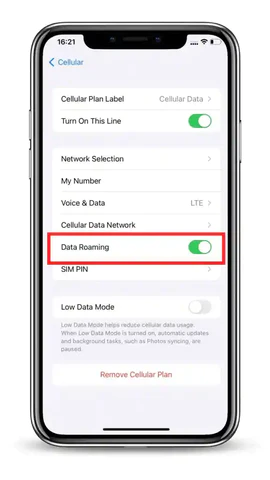
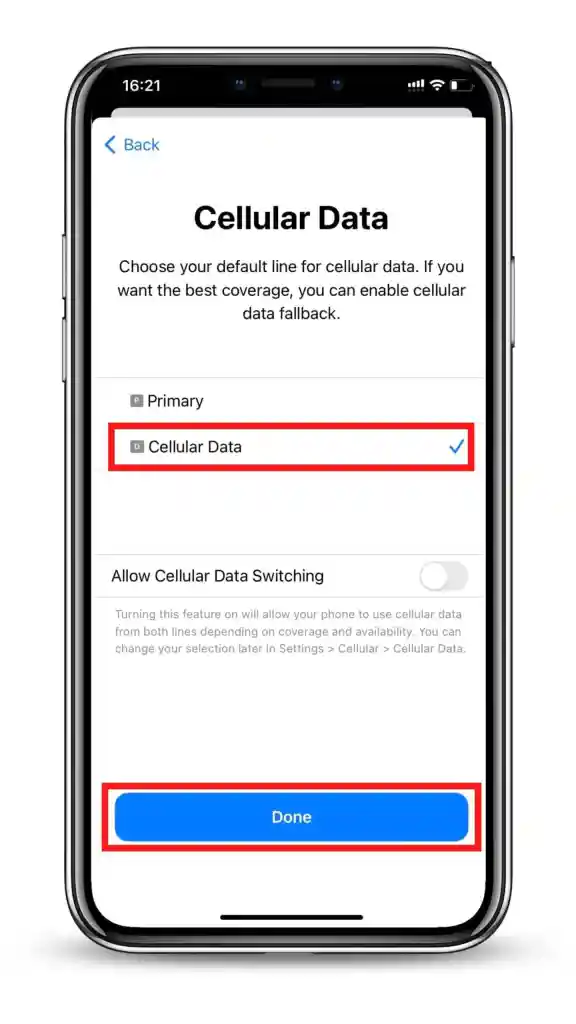
- Step 7: Set your eSIM profile as the default Cellular Data > select Done. Switch off the Allow Cellular Data Switching to avoid roaming charges.
- Step 8: Turn on Data Roaming to start using your eSIM.

2.2 How to Install eSIM on Samsung
Steps to take:
- Install your eSIM the day before you leave for travel and activate it during your flight or when you arrive at your destination.
- Select the type of device on which you are going to install an eSIM on (iPhone, Samsung, Google Pixel)
- Follow the QR code installation if you have the code on another device to scan
- Follow the Manual Installation if you are unable to scan the QR code.
Need to know before installation and activation:
- Ensure your device is eSIM-compatible and carrier-unlocked. Check out if your phone works with eSIM or not.
- You must have the QR Code on another screen or device or printed paper to scan it with your phone camera.
- Ensure that your internet connection remains stable throughout the entire process
- The QR code or manual installation can only be done once.
- DO NOT remove the eSIM from your device because it cannot be used again.
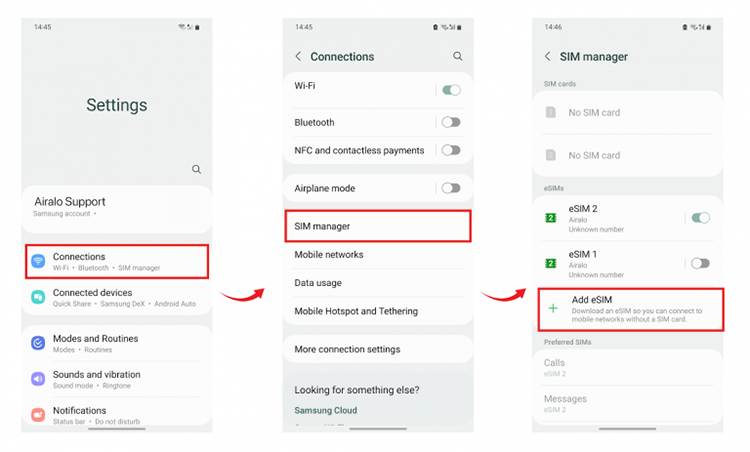
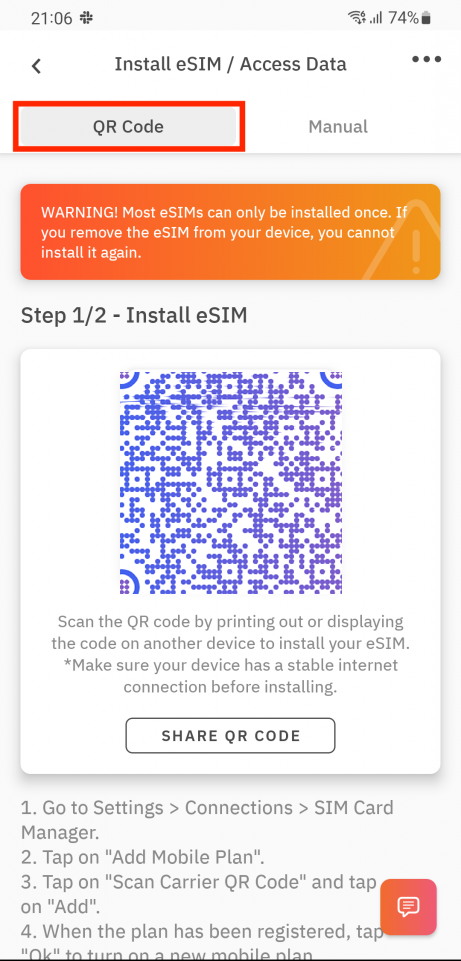
2.2.1 Installation eSIM on Samsung (Android)
- GO to Settings.
- TAP Connections.
- TAP SIM Manager.
- TAP Add eSIM.
- TAP Scan QR code from service
- TAP Scan QR code from service provider.
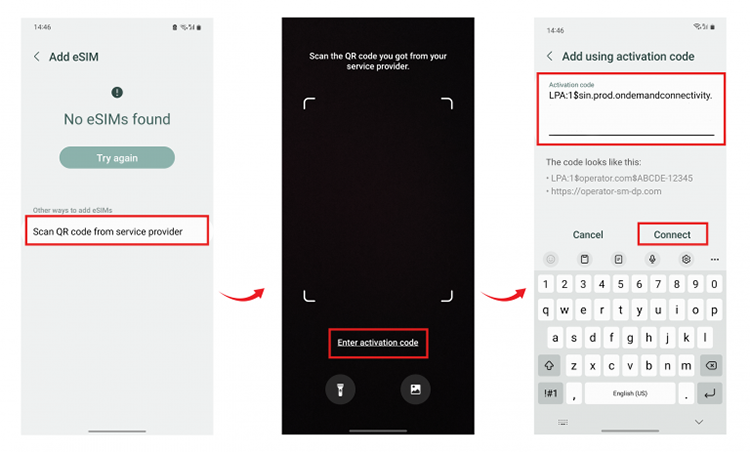
2.2.2 Steps to install eSIM manually on Samsung
- GO to Settings.
- TAP Connections.
- TAP SIM Manager.
- TAP Add eSIM.
- TAP Scan QR code from service provider.
- TAP Enter activation code.
- ENTER the activation code found in the eSIM details in the Airalo app.
- TAP Connect.
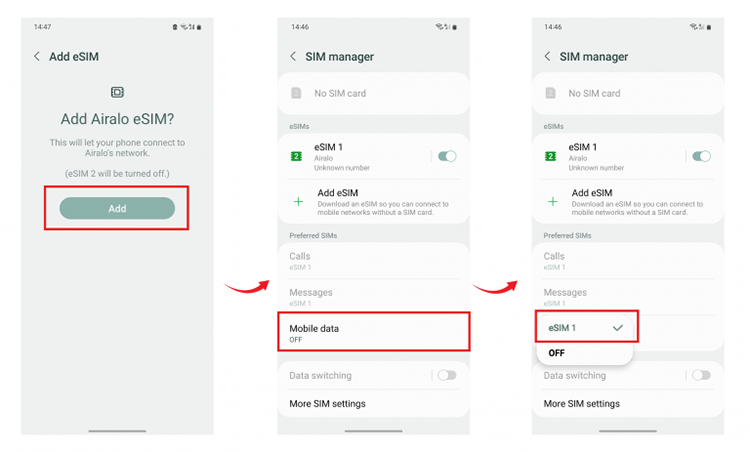
- TAP Add.
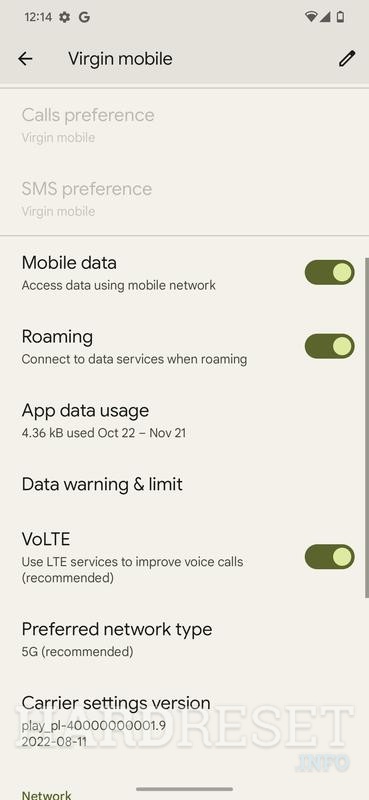
- Once the eSIM is installed, you will be brought to the Settings page.
- SCROLL down and TAP Mobile data.
- SELECT the eSIM you installed.
2.3 How to Install eSIM on Google Pixel?
Once you have purchased your virtual SIM card with a local or international provider you can start with the configuration. We recommend you to do it through a QR code, which when scanned will automatically perform the configuration of your eSIM in the phone.
- Choose the “QR Code” tab at the top
- Go to Settings on your device
- Tap on Network & Internet
- Tap the Add or + icon next to Mobile Network
- Tap Next when asked, “Don’t have a SIM card?”
- Scan your QR code and add the confirmation code if prompted
- Go back to your “Install eSIM/Access Data” screen.
- Turn on eSIM under Mobile Network
- Enable Mobile Data
- Enable Data Roaming (Please turn off your primary line to avoid roaming charges from your carrier provider when overseas)
- Go to Network & Internet and tap on the Mobile network to set the correct network preferences listed in the Additional Info which is at the bottom-right of the selected data package page.
- Set up an APN(access point name) on your device if required.
How to install esim manually on Google Pixel
- In Settings, TAP Network & Internet.
- TAP the + icon next to SIMs.
- TAP Download a SIM Instead?
- TAP Next, and TAP Need help?
- TAP Enter it manually and ENTER or PASTE the code found in the eSIM details in the Airalo app.
- TAP Continue to install the eSIM.
-
Once the eSIM is installed, TAP Settings.
-
Turn ON the toggle button to ensure the eSIM is Active.
-
Turn ON the toggle buttons for Mobile Data and Roaming.
If you have any questions, please feel free to contact https://laos-esim.com/, and we’ll be happy to help!